
Yesterday I explained the basic weekly planner stickers for those people who keep asking me in no uncertain terms, what the heck I'm doing these days.
Today I'm going to go through a quick Plan With Me or PWM for those newbies out there...
I have not dug up the courage to film it yet. One of these days I would like to try it youtube style like all those PWM videos I enjoy watching.
I remember the day I told my sister about PWMs...
"It's a video of people putting stickers in their planner."
Silence.
"You just watch them put the stickers in their planner."
"Yes."
Giggle.
"That's all they do..."
"Yes."
Hilarious laughter.
It was very much like the time I explained the enthralling game of Tiny Towers to my mother.
For any of you Tiny-Tower-Newbies, it's a game where people want to go in the elevator.
And you take them.
Hilarious laughter.
So, I've determined that I am very easily entertained, and I am hoping beyond hope, that you are too, because here I am about to do my first PWM and it's not even in a flashy video with voice-over or anything.
Recognize this set?
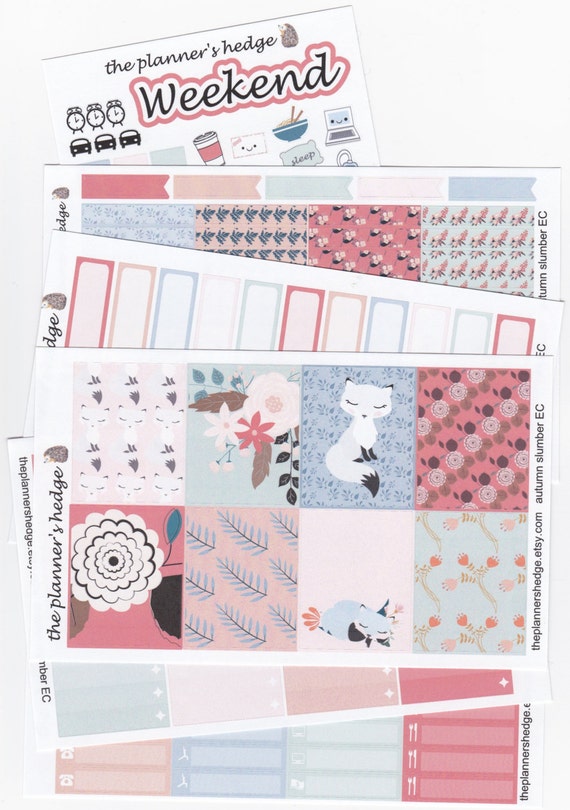
If you read my stickers explained post yesterday, you would.
"You mean she's not even using new material for this?"
Nope.
Simple entertainment.
I hope.

And this is the Erin Condren vertical LifePlanner.
Now right there we have a common confusion - the whole vertical/horizontal thing.
The planner pictured above is called a vertical style by Queen Bee E.C. herself, because each day is displayed in a vertical column.
I have heard many people call this horizontal because the week spreads out from left to right horizontally, and I see how that could be so easily determined, but that's not how the Miss E.C. named it so work with me people!
When I'm planning in my EC vertical, it also happens to be colorful, and all that lovely watercolor crap at the top of the vertical day columns shows very much around the top of my stickers, so the first thing I do is fold back the edge of my headers sheet and hold the stickers right up against all that lovely watercolor crap to make sure they don't clash.
I might be easy to entertain, but I cannot abide clashing.
The very next thing I do is turn the whole planner around upside-down.

This little trick saved my planning sanity.
Why?
Because I like to plan my days from the top down *but I find it infinitely easier to line the stickers up when going from the bottom up. So by planning upside-down, I get a nice easy to line up stack going from the bottom up, while the actual day is being planned from the top down, and I hardly ever have to peel off and try again when things go off kilter as they always do when I try lining them right side up.
About half way down, I flip it back to check on things.

In this week, I placed the ombre check list boxes at the top. It's back to school week for my kids so I had a lot of little to do's to get done in preparation, and I like getting straight to them.
I placed the Today headers just below and then color blocked the full boxes to go with the ombres. I think it gives it a cleaner more cohesive look when color blocked, though sometimes it requires more thought when placing the obres than I gave it this week.
You'll see in the photo below that I ended up with two feature boxes side by side on the weekend, which I usually try not to do.

I could have switched it with Monday if I'd been thinking ahead, but I also knew Monday would be covered with appointments... so there it is.

Before I start my Littles I put in any appointments and special events that I have scheduled. My handwriting is my mortal enemy, but to make it less messy I write on my half and quarter boxes before placing them. It's easier than writing next to a coil, and if I really screw it up I can just write a new one.

Once my appointments and events are in, I can think about the Littles based on what I'll probably have time for. I usually leave most of them blank until the day unfolds. Littles are the first thing to change if my schedule gets too busy.

At this point, I start putting in my chore and me-time stickers.
See that little ramem noodle bowl in the photo below?
I once sold 1,ooo of those to someone for an event in Chicago. I am wildly curious as to what she did with them!
All I usually do with them is highlight a lunch date, or this spread, mark my meal-planning task.

I used a row of half boxes at the bottom of the littles this week. I'll use that as extra space if something comes up and a place to stick in the back to school pics that I will print with my Polaroid Zip.

I dressed up the side bar with my favorite fox box, and used a checklist flag for my business goals, a weekly box for my daily cleaning zones, and habit trackers for my daily goals.

And that's it.
Well, that's it before I muck it up with all my bad handwriting, anyway.
I fill in the rest as I go through the week.

And here's the sticker sheets I used.
I will keep them handy in my planning space because I know I will be using many more of those little icons as things come up.

Of course, it's all really about waiting for that...

weekend.

No comments:
Post a Comment